This blog has moved! CLICK HERE TO VISIT THE NEW BLOG

Popular categories

Monday, November 21, 2011

Reveal?

Are you wondering if I am ever going to show the final reveal from my stenciling project I gave a sneak peak of nearly a month ago?  Sorry it's taking so long!


Here's my excuse (ready?):

It's not that it's not finished. In fact, by the time I posted that progress picture, it was secretly entirely finished. It's not that I don't love the final result. Seriously, I love it. It's... I can't find my camera.


Anti-climatic right?

Well, I have figured out where my camera is. On a trip with family it somehow ended up going home in my sister's bag instead of mine. Should be easy to get  it back, right? She only lives 3 miles from me.

Well, due to our busy schedules, it's starting to seem like I won't see my camera until my next family trip, for Thanksgiving. So I will definitely be posting those reveal pictures as soon as I get home from Thanksgiving.

Meaning they will be revealed only about 5 weeks after the project was done. Oops.


And  I haven't posted anything else in this time mostly because I know you guys dig photos. I've made some stuff. A couple dinners, mostly. But I'll have to recreate them later so I can take photos when I have my camera back.

Here are a few other things I have done recently, to keep this entire post from being an apology"


  • Had fake-flu- it was just as unpleasant as real flu, but my temperature was lower instead of higher than it is supposed to be.
  • Finally read Hunger Games (in one day...couldn't put it down) after a friend in class lent me her copy.
  • Watched the full series of Being Human (the UK version) on netflix streaming.
  • Wrote a paper for class while in a flu-y fog. I am not sure that thing is even coherent. I guess I'll find out when I hand it in today.
  • Took two sick days from work...more sick days than I have taken in a row in recent memory. Luckily this came after a talk with HR about how I really am supposed to use my PTO days- I hadn't been taking any time off for so long I needed the reminder.
  • Lost 4 lbs in 3 days. Yes, the flu is one way to loose weight, but I don't suggest it. I also am pretty sure I will gain all that back instantly now that I can eat again.
Anyway, what have all of you been up to? I really can't wait to show you the completed stenciling project...I love the result so.

Sunday, October 23, 2011

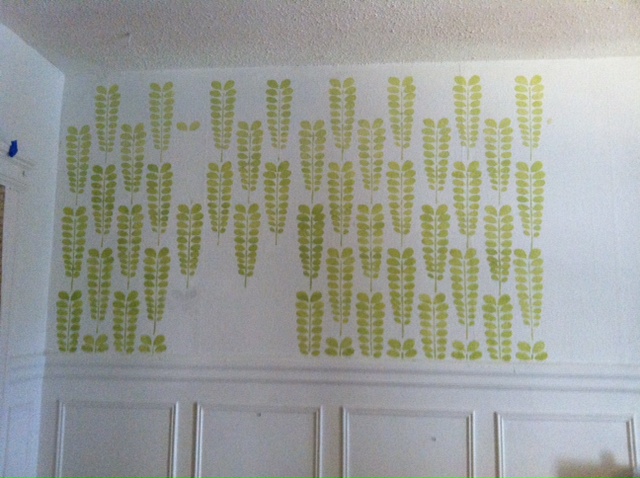
In progress

Here is an in progress shot of a recently completed project I'll be sharing soon. Thought you guys would like a sneak peek!

Saturday, October 22, 2011

A post about bikes on my blog about- what again?

So I have read very many posts from other bloggers giving tips to find a loyal readership and be successful. And one of the first things they always say is to find your niche and more or less stick to it. I have done a lot of thinking, and while I love getting new readers, I decided that sticking to a niche just isn't what it's about for me.

Some of you have been reading this blog since it started more than a year ago, when it was strictly a place for me to share recipes, and motivate myself to try making new things. After about 6 months, I decided I just had to share about my decorating adventure when I covered my refrigerator with contact paper.  Yes, I did that. It wasn't a post about cooking, I realized, but at least it related to the kitchen where I cook!

Soon after I found myself posting about repainting the kitchen, and painting my new mis-matched purple chairs. After that it became open season for DIY/interior decorating posts of all sorts as well as recipes and cooking posts.

At this point I have blogged about everything from my cleaning compulsion, to bird watching, to my finds on Etsy.  And I realized something. I don't blog to make money (you'll notice no ads on this blog, ever, and if you see a link to a product in the text, it's just because I think you guys might enjoy that link, not because I will make any money off you clicking on it.) I blog because it makes me happy, helps me express myself, and helps me motivate myself to do the things I love. And I don't just blog about cooking, I blog about many of my interests.

I never mean to disapoint a reader of course, and I would love to meet more cool and interesting people who like the things I blog about, but it just doesn't feel right to limit myself to one subject when collecting a certain number of readers, or making money has never and will never be my goal.

So, in short, if you read my blog: 1. I love you and 2. Read which ever part makes you happy, leave me feedback if you like something, and feel free to skip those posts that don't relate to an interest you share with me!

Now, without further adieu, a bit of a post on a subject VERY unrelated to both cooking and interior design, but something I like a lot- my bike.

I've mentioned two bikes on this blog so far, my vintage English 3-speed (let's call him Phil) who showed up here.

He really is a beauty. Just look at him. He has a sweet internal gear hub, original stamped Phillips plaque, and the most uncomfortable bike seat ever made (I kid you not).


Isn't he a looker? Maybe it is just my love of vintage that draws me to him.

But I have a new love- who is sleeker, faster, brighter and very importantly LIGHTER than good old Phil.

She doesn't have a name yet, but if she did, it would have to be something girly and fun. Maybe Lucy or Posey or something like that.


Similarly to Phil she has a steel lugged frame, but being about 15 years younger and at least 12 pounds lighter, she makes for a very different sort of bike ride. And I am falling in love all over again with the streets of Boston as I she guides me from place to place. She is fast and reliable, and her bright colors make me so happy the moment I see her, locked up at a bike rack patiently waiting for my return.

Pedey likes her too.


Do any of you bike? Do you do so for transportation? Fitness? To save the world?

Or, if you don't bike- what's your favorite way to get from place to place?

Display shelves for the crafting/study area

Some people have the luxury of a separate room to call their office, craft space, or sewing room. I don't. I have read lots of debates in the home decor blogosphere about office spaces in the bedroom. I understand the point of view that a bedroom should be relaxing and tranquil, a place to get away from the work and projects of the day. That is a very nice idea. But for some of us, it just isn't feasible to keep our sleeping quarters totally separate from our at-home workspace.

Because I live in a shared apartment with roommates, the only space that can truly be "mine" is in my bedroom.  I am lucky, though, to have a fairly large room of my own to work with. I wanted to create a space that would fit in with the feel of my room, but still be very functional. I decided I wanted to build shelves above my desk both for display and to store craft supplies.

I recently rearranged my room, and my desk ended up in the little nook created by a former doorway. I have been so inspired by the closets turned to offices (or cloffices) I have seen on the web in the last few years, and I wish I had a closet to use for that purpose. Since I don't (I don't have a closet at all in fact!) I thought the moulding of this doorway frame could at least give the illusion of a "nook" in which to make my office/craft space.

To start I did some measurements, and bought some lumber. Then I felt a little overwhelmed, so I got some help.

My boyfriend Ben drew out this plan and remeasured everything for me. He's better at this sort of thing, and drafting seems to make him happy, where as it seems to make me an anxious wreck.
I know you dig that teal nail polish I got going on.

Then I let him do the dirty work of cutting down the lumber to size, too:
And then I let him mount the shelves, make sure they were level, and install the vertical supports. Yep, I pretty much just made him do everything. Oops. Well, besides the painting. I did all the painting. Oh, actually, he did paint on the primer... But anyways.

One thing I actually can take credit for in this project, is the paint color. I am far too proud of myself, really, because if anyone asks me what color I choose, I get to say "it's custom." I have a lot of near empty or half full cans of painting hanging out in my hardware closet (what, you don't have a whole closet devoted to hardware supplies, tools and paint?) and so instead of having to pay for more paint to get the right color, I recalled the color wheel from my art class days. I had a pale blue, an electric green, a charcoal gray and a deep turquoise among other colors, and I got to mixing.


Here you can see a bit of color testing, including some combinations I made myself. I ended up going with the slightly darker pale turquoise tone, which you can see on the far right. It was just a bit more muted than the brighter blue, and I didn't think I'd like it, but once it was on the wall I knew it was the one.

And the building began. We (can I say we?) used simple L brackets to attach the cut 1x4s to the wall, made sure everything was level, and then added vertical supports from remaining pieces of lumber.

Next came priming and painting the wood shelves, caulking any gaps, and touching up the background color.


I have yet to feel really satisfied with the styling of these shelves, I want to take some time and collect some quirky items that make me happy to live on these shelves, along with my jars of art supplies. Here's the styling as it exists now...Surely I will make an update later when I decide exactly what I want up here.


Do you have a work or craft space in your home? In your bedroom? Have you undertaken any minor or major building projects recently? How do you feel about drafting and measuring-- boring or rewarding and pleasurable?

Roasted Roots & Tubers Pizza


One of my favorite family recipes is a side dish my mother always made called roots & tubers. She cut small potatoes, sweet potatoes, carrots, parsnips and onions (am I forgetting anything, Mom?) and roasted them in a pyrex dish with olive oil until they were a perfect combination of soft on the inside, crisp on the outside, and sweet.

I was reminded of that side dish when I saw this pizza recipe from Martha Stewart, and decided I had to give it a try. Roasted root vegetables and herbs with ricotta on pizza? An odd combination maybe, but it sounded totally delicious. And was also reminiscent of the ricotta and butternut squash crostini I had recently made, and I even had ricotta left over from that. Perfect.

I made this my own by changing some ingredients as I saw fit and adding a drizzle of balsamic reduction at the very end before serving. I love the way the rich sweet flavor of reduced balsamic plays against the earthy fall flavors of the root vegetables and also seems to bring out the contrast of the light smooth flavor of the ricotta.

I was intending to make a pizza dough from scratch, but this ended up being a last minute meal made straight after getting home from work. Luckily, I am a fan of the pizza dough sold by Whole Foods, and I was able to stop in and pick some up near my work.

Pizza is always a simple meal to assemble, and giving a recipe for a pizza sometimes feels redundant. It's like telling people how to make a sandwich, right?

But, as this is how I like to do it, I will include the groceries you will need and the cook times to recreate the pizza as I made it.


Roasted Roots & Tubers Pizza
Inspired by this Martha Stewart recipe

INGREDIENTS:


  • your choice of fall vegetables, consider including: fingerling potatoes, little red potatoes, sweet potatoes and/or butternut squash, carrots, parsnips, red onion. (You can also include other vegetables that suit your fancy, look for ones that are hearty and can roast for a long time, so you can prepare all of the vegetables at once in one dish.)
  • a homemade or store-bought pizza dough
  • a small container of ricotta cheese (I had some left over from my crostini, so I used that. It had some lemon zest and juice mixed in, and I found I liked the brightness this added)
  • A variety of fresh herbs to keep things interesting(I used fresh rosemary and thyme which I cooked with vegetables, and then added the sage leaves to the top of the pizza before baking )
  • olive oil, salt & fresh ground pepper 
  • one cup of balsamic vinegar to reduce

STEPS:

To prepare the Roast Roots & Tubers topping:
1.Chop the vegetables into small similarly sized pieces. I look for small carrots, potatoes and parsnips, as the skin is usually thinner and you can scrub them and then roast them with the skin on instead of having to peel them. If the skin seems thick or you think I am crazy for doing it this way, by all means, peel away!

2.Add the chopped veg to an oven proof dish or baking sheet. Drizzle with olive oil, sprinkle with salt and pepper, and add a small sprig each of thyme and rosemary- no need to remove from the stem or chop, the flavor will cook right into the oil and roots over the course of the roast.

3.Place in a hot oven (about 450 degrees) and roast, tossing as needed to brown all sides of vegetables for about 40 minutes. Remove from the oven and let cool. remove herb sprigs.

For the Pizza:

1. Stretch dough onto a baking sheet (or preheated pizza stone, I love using mine!) with a bit of olive oil. 
2. Spread on the ricotta as thick as desired.
3. Add the cooked vegetables and and sage leaves, nestling ingredients into the spread ricotta.
4. Bake in a preheated oven (475) 20-25 minutes (until crust is golden)

MEANWHILE... reduce your balsamic vinegar by pouring it into a small sauce pan over medium high heat. Pay attention and stir often so the bottom doesn't burn. You can add some sugar to speed up the process and add extra sweetness, especially if the balsamic you are starting with is of poor quality. after the balsamic has reduced, keep it slightly warm until you can drizzle it over your pizza. 

A tip- Wash the pan you reduced the balsamic in asap...that stuff can become sticky as it sits!

LinkWithin

Related Posts Plugin for WordPress, Blogger...