This blog has moved! CLICK HERE TO VISIT THE NEW BLOG

Popular categories

Showing posts with label diy/home improvement. Show all posts

Tuesday, February 21, 2012

The First "Before"

While going through some old emails, I stumbled upon the photos I took when first viewing my current apartment. When my roommates and I saw this apartment we knew it was the one for us, but clearly we had an imagination. We saw how great this apartment could be, even if it looked pretty bad at that time.

How bad was it? Well each wall was painted a different pastel color, the floors in the kitchen were ancient peeling linoleum, and every surface was just about as dirty as imaginable. The landlord agreed to put in a new floor in the kitchen before we moved in,  and paint everything back to white. Things did look a lot better when we moved in, but it was still pretty dirty, and needed some cheerful updates.

I thought you guys might want to see a couple of these before shots next to how the rooms look now...
Lots of pictures, so come check them out behind the cut:

livingroom

Friday, February 10, 2012

Put an octopus on it.

I have had an ikea Leksvik dresser (no longer available as far as I can tell) for 6 or 7 years now. It has served me well, and survived multiple moves, having yet to fall apart. The only major scratch on it came from when my boyfriend (at the time) helped me initially assemble it (which was disastrous.) It has nice deep drawers (actually even big enough to store my sewing machine in one), and is actually sort of nice looking. There is really nothing wrong with it.


But it needed something.


So I put an octopus on it.


Ah, much better. 


Octopus decal purchased from this Etsy shop.

Wednesday, January 4, 2012

All in a year

While reading a year recap of the design changes posted by Michelle over at Decor and the Dog I started to think about how much has changed in my own home this year. It's a lot!


Earlier this year I painted my kitchen. I went from hating the boring look of the space:

To loving it's cheerful, colorful make-over:

In my living room I went from making excuses ("it's all stuff that came from my last apartment mixed in with my roommate's old stuff." "there are so many of us living here that having enough seating takes priority over design"):

 To having a space that I love the look of and the functionality. Ultimately a lot of stuff stayed the same, but new throw pillows, chairs, curtains and wall art made a big impact:
I've also made big changes in my bedroom this year.

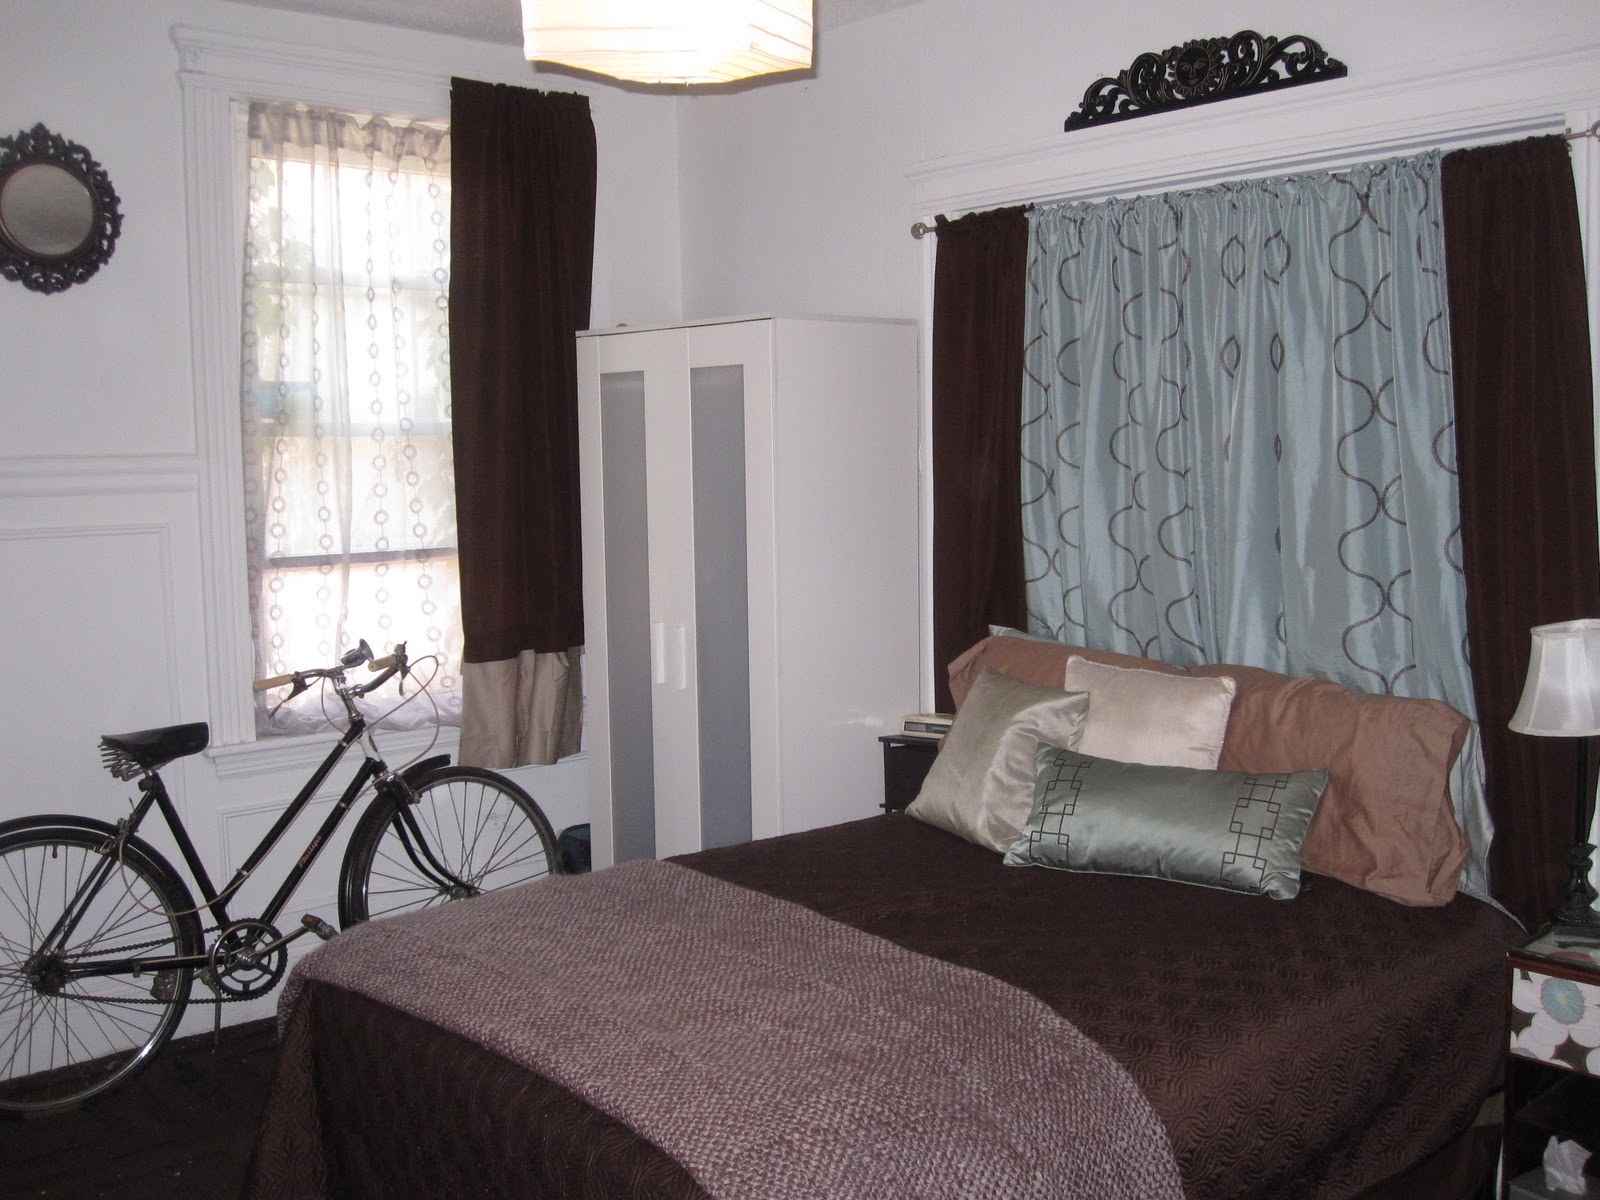
2 years ago I loved the combination of chocolate brown and light blue, and I put my room together using those colors. I loved it at first, but soon the dark colors and repetitive color palate was driving me crazy!

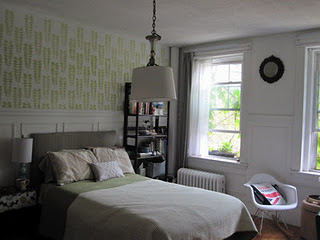
In the end I rearranged the furniture, built  a new headboard, replaced the desk, and gave the room a dose of color with a painted stencil and some bright paint in the new "desk nook" :


And I made some updates in my foyer/entryway.

(I need a better picture of this now that I have a better camera!)

So that does seem like a lot of changes, doesn't it? A few more improvements I am planning to make in the upcoming year include replacing some photos on this site with better quality pictures taken with my new camera, and posted more recipes since it's been awhile.  I also have a few small projects I am planning on taking on, and we will see what else the new year brings!

Outside of the blog I have a lot of new and exciting things on my plate for 2012, I have started a 30 before 30 list with some lofty goals (good thing i have 5 years to accomplish them.) How was everyone's new years? Anybody make any resolutions they are excited to work towards? In what ways have your homes changed this year? What other significant changes have you seen in 2011? What are you looking forward to see change in 2012?


Monday, December 26, 2011

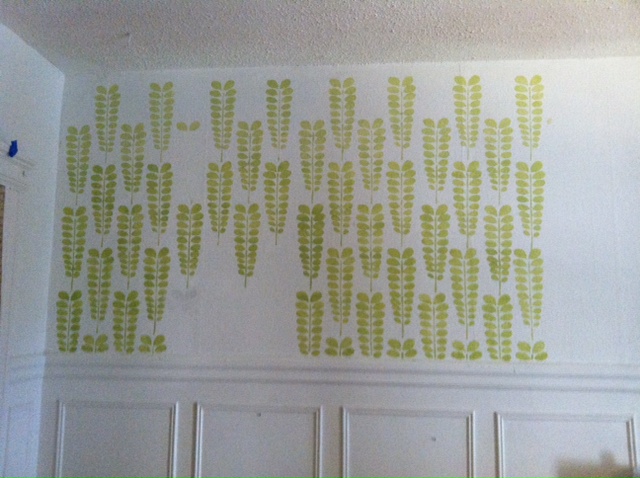
Wall stencil photos (finally)

While at my parents' home for the holidays I used my mother's camera to upload the contents of my memory card, allowing me to finally post these pictures taken of the wall stenciling project I did in October before my camera broke.

Because it has actually been more than 2 months, a few things in the room have changed (I just can't help it!) mostly the only changes worth noting though are few bedding changes. I will post updated pictures soon, and thanks to an amazing Christmas/Chanukah/Solstice gift, the pictures may be much better quality (I got a DSLR!!!)


I had intended for a subtle ombre effect by adding a bit of white to the paint progressively as I worked up the wall. But I think it may have been a little too subtle. You can see the effect fairly well in the last picture, plus you can see the beautiful capiz shell mobile/chime that was a gift from my cousin last year. :)


There you have it, finally. Happy holidays, everyone!

Little TV

My apartment is going back in time. We are leaving our days of having a giant flatscreen HDTV behind and switching down for this old 20" CRT. (This change came from the moving out of the roommate who owned the flatscreen.) Perhaps I should feel sad to downgrade, but I couldn't be happier. Having a smaller TV on a smaller stand to me makes the whole room seem so much bigger. Plus, none of us watch much TV anyway. This goes hand in hand with our recent decision to reduce to basic cable to save lots of money on a service we hardly use anyway.

The TV stand looks so cheery in it's new bright sky blue paint. I picked that table up at a thrift store for $9. The TV was free. And, I have a pretty dorky project in the works- A TV Cozy! More on that soon. For now, check out how different this corner of the room looks, below.

Sadly I couldn't take a picture right before we took out the TV (my camera was broken!) so this picture has some outdated decor in it, but is the only one I could find. The second picture has our up to date decor, but doesn't quite show the TV area.
.
BEFORE:

And now:

and yes, I was watching The Blues Brothers on VHS when I took this.


I know most people would prefer a big flat sceen TV. But for me, a TV that takes up less space and makes less of a statement is better. Our living room feels bigger than before, and easily lends itself to conversation and socializing more than just watching television.

Sunday, October 23, 2011

In progress

Here is an in progress shot of a recently completed project I'll be sharing soon. Thought you guys would like a sneak peek!

Saturday, October 22, 2011

Display shelves for the crafting/study area

Some people have the luxury of a separate room to call their office, craft space, or sewing room. I don't. I have read lots of debates in the home decor blogosphere about office spaces in the bedroom. I understand the point of view that a bedroom should be relaxing and tranquil, a place to get away from the work and projects of the day. That is a very nice idea. But for some of us, it just isn't feasible to keep our sleeping quarters totally separate from our at-home workspace.

Because I live in a shared apartment with roommates, the only space that can truly be "mine" is in my bedroom.  I am lucky, though, to have a fairly large room of my own to work with. I wanted to create a space that would fit in with the feel of my room, but still be very functional. I decided I wanted to build shelves above my desk both for display and to store craft supplies.

I recently rearranged my room, and my desk ended up in the little nook created by a former doorway. I have been so inspired by the closets turned to offices (or cloffices) I have seen on the web in the last few years, and I wish I had a closet to use for that purpose. Since I don't (I don't have a closet at all in fact!) I thought the moulding of this doorway frame could at least give the illusion of a "nook" in which to make my office/craft space.

To start I did some measurements, and bought some lumber. Then I felt a little overwhelmed, so I got some help.

My boyfriend Ben drew out this plan and remeasured everything for me. He's better at this sort of thing, and drafting seems to make him happy, where as it seems to make me an anxious wreck.
I know you dig that teal nail polish I got going on.

Then I let him do the dirty work of cutting down the lumber to size, too:
And then I let him mount the shelves, make sure they were level, and install the vertical supports. Yep, I pretty much just made him do everything. Oops. Well, besides the painting. I did all the painting. Oh, actually, he did paint on the primer... But anyways.

One thing I actually can take credit for in this project, is the paint color. I am far too proud of myself, really, because if anyone asks me what color I choose, I get to say "it's custom." I have a lot of near empty or half full cans of painting hanging out in my hardware closet (what, you don't have a whole closet devoted to hardware supplies, tools and paint?) and so instead of having to pay for more paint to get the right color, I recalled the color wheel from my art class days. I had a pale blue, an electric green, a charcoal gray and a deep turquoise among other colors, and I got to mixing.


Here you can see a bit of color testing, including some combinations I made myself. I ended up going with the slightly darker pale turquoise tone, which you can see on the far right. It was just a bit more muted than the brighter blue, and I didn't think I'd like it, but once it was on the wall I knew it was the one.

And the building began. We (can I say we?) used simple L brackets to attach the cut 1x4s to the wall, made sure everything was level, and then added vertical supports from remaining pieces of lumber.

Next came priming and painting the wood shelves, caulking any gaps, and touching up the background color.


I have yet to feel really satisfied with the styling of these shelves, I want to take some time and collect some quirky items that make me happy to live on these shelves, along with my jars of art supplies. Here's the styling as it exists now...Surely I will make an update later when I decide exactly what I want up here.


Do you have a work or craft space in your home? In your bedroom? Have you undertaken any minor or major building projects recently? How do you feel about drafting and measuring-- boring or rewarding and pleasurable?

Monday, September 26, 2011

Bedroom project: New headboard

I recently upholstered myself a new headboard. It was one of those projects that was so simple and quick and that I had wanted to do for so long. Yet I didn't realize what would happen next: I would want to change everything else in my room, too! So essentially a one day project became weeks of updates and money spent and splinters, and getting paint on my favorite slippers. It works out that way, sometimes.

You may remember this picture I posted last year which shows my bedroom set up:
While I liked the way my room looked, it actually felt a bit too formal to me. The new set up is much more in touch with my current style, and it's lighter. So I said good bye to the curtained faux headboard, as well as the chocolate brown accents, and I created an upholstered headboard in a fabric I love. Recognize the fabric from my updated entryway bench project? Yep, it's the same.

Here's the new bed design:


By the way, see that weird branch hanging down in front of the window? My building is covered with vines, and durring the recent hurricane this one broke off the building, and in a strong wind rapped against the window and broke it! There is a giant crack going all the way through the window pane in 3 directions. I am still waiting for the building managment to come take a look, I hope they cut down that branch when they come, I am scared with it just hanging there that in a day with bad wind the whole thing could happen again!

You may also notice in the above picture that I moved the bed, it is no longer framed out by that closed off doorway. Want a sneak peek of what that area of the room looks like now? The detailed post is soon to come, but in the meantime:


I still have a lot of updates to take on, and completed ones to show you, here's a bit of what to expect in the future around here:

In my bedroom I'll be completeing these projects:
1. a patterned stencil wall above the bed
2. a DIY update to my overhead light fixture (I recently added a plain white drum shade you can see in some of the pictures above, but I am planning on making this more of a focal point)
3. a fun DIY update to a my desk chair
4. Building a new nightstand

And a few things I have yet to share with you, that I look forward to posting about:
1. The new crisp white sheers I hemmed for a more tailored look and some needed privacy
2. A few solutions to storage issues- especially since I am so worried about things looking even a tiny bit cluttered, but I live in a relatively small space, with no closet!
3. Of course- the built in shelves I built (with help) in my new desk/craft space as previewed above

Ok, and to wrap things up just one last picture for honesty's sake.

This is what the opposite side of the room turns into when I need to clear all the junk from the area around the bed and desk to take photos:

Yep, not so perfect.

Friday, September 16, 2011

Entry way update

I hinted before my blogcation that I was making an update or two in the entryway to my apartment. I believe I posted this pic as a teaser:


The entrance to my apartment has been the subject of many posts, including all of the many steps of my still-evolving sidewalk-find dresser turned entryway table. But while that side of the foyer has been shown on this blog over and over the other side of the same space never has.

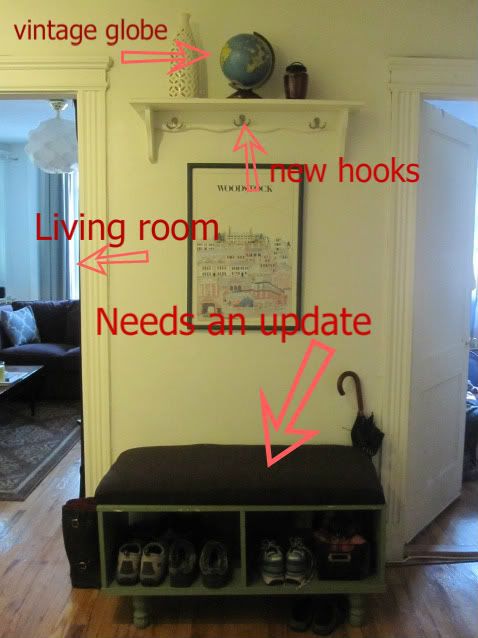
Why? Because it was weird looking and never really lived up to what I wanted.  I found a media shelf in the trash of a building near my own two years ago. This was really my first DIY furniture hack. I took it, removed a few shelves, painted it, removed the casters to add feet, and sewed a simple cushion for the top. Voila! Entrance bench!

Except.... Well except I never quite liked it.

Why? I guess there were a few reasons.

1. I luckily happened upon 4 unfinished wooden legs at goodwill right after deciding I wanted to change out the casters for real legs.  But even from the start their style was too traditional and even "country-ish" for what I wanted.

These were a pretty close match to the legs I found, but mine were shorter:


2. The color I chose, a sage green, was a paint I had on hand which had a similar tone to the tablecloth that sat on the old entryway table, which was a pretty sad folding table I had gotten from my parents. I later decided that the color made the bench look sort of heavy and dated instead of fresh and light like a coat of white paint might have.

3.The cushion, which took me forever to sew, since I didn't have a sewing machine at the time, looked sort of lumpy and sad  instead of cushy and welcoming.


See? You can't see the legs from that angle, but you can see my sage color choice, the still existing pegs where the shelves used to be, and my hours and hours of hard work on that lumpy sad cushion. Sigh.

***Also, a quick apology- I took not one but several before pictures of this project. Sadly they are all sleeping with the fishes so to speak, in the depths of my sadly departed laptop. Shall we have a moment of silence?***


Later I found a large bead-board mirror at a local thrift store, and placed it above the bench, after painting it with same sage green paint. I thought the matching color would tie it all together to look a bit like the built in entry way benches I had seen occasionally online.

Unfortunately, I was working with something sort of weird to begin with. Our entrance way came with a shelf and coat hooks already on the wall, which we probably weren't supposed to mess with, since it was a rental. Nice, right? Except...the shelf was hung too high for much good use, and had a curvy country-home style that I was not a huge fan of. AND the coat hooks on the wall? Make that actually a crooked chunk of 1x3 lumber with a few 30 cent cup hooks.

In my most recent redo, I decided to work with the shelf, and use it as a display space instead of anything too functional given it's height  (I can only reach it if I stand on the bench to do so).

But the 1x3 wood scrap complete with brass cup hooks? I took that baby down. And threw it in the trash. And no one will miss it.


Due to my sad story of long lost before pictures, the only thing I have to satiate your curiosity about just how awkward that 1x3 "coat rack" looked, is this picture from after I took it down.  Even in its absence you can see how crooked it was, right?

Luckily a little primer and paint hid every hint that this was ever there.

I ended up buying some nicer brushed nickle coat hooks and drilling them into the base of the shelf. You know the kind that look like an octopus ready for a fight? Surely you all saw this make its rounds earlier this year- I first caught it on Laughing Squid, but am not entirely sure where it first appeared.


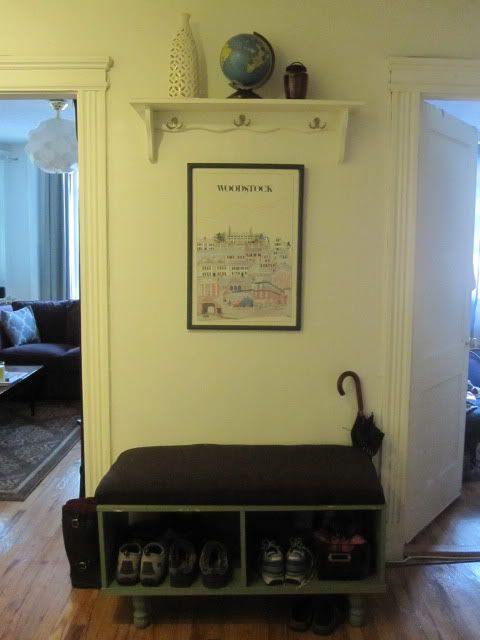
Next I replaced the bead-board mirror with a framed print I happened upon at the same local thrift store mentioned earlier. And, get this: the print isn't just a drawing of buildings from a cute new england town, it's pictures of buildings from the cute New England town I went camping in with my family nearly every year of my childhood. Lots of nostalgia. The frame it came in was pink plastic...I painted it with a bit of charcoal gray paint and I love it. Isn't it a cute little print?


I also rethought the cushion on the entry way bench, and made one by upolstering a piece of plywood with a few layers of foam, and the same fabric from the previous cushion.


I thought it looked a lot better, but still something wasn't quite right. I wanted the bench to look...fresher.

For your amusement I have put my mad-editing skills (ok, try my hillariously ametuerish editing skills..) into this info-graphic to better explain the situation in the picture above:


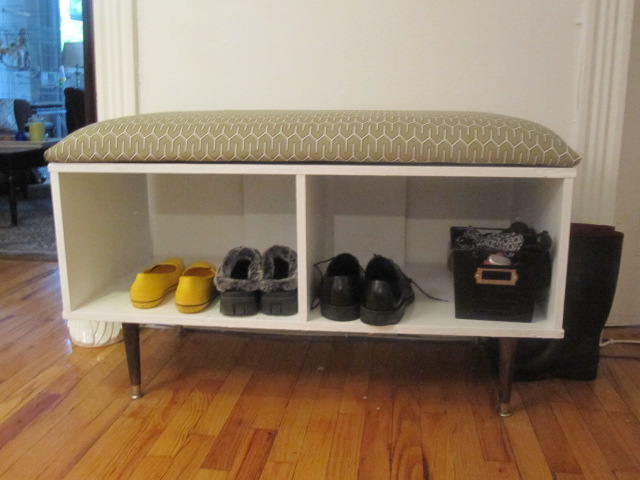
So I made a few updates... I used Dwell Studio's Indoor/outdoor fabric in Maze Work Brindle to recover the cushion. I chose an indoor/outdoor fabric since I figured there would be lots of wet rain coats and such making contact with this cushion. A bit of water resistance would be great!

I replaced the legs with some nice mid-century inspired ones which I special ordered from Home Depot and gave a quick coat of dark walnut stain, finally removed the pegs that used to hold to removed shelves, puttied, sanded, primed, and painted the whole thing white. Then I placed my white owl umbrella holder next to it...to rally up any big umbrellas.


Ah, so much better!


As seen above I added a few decorative items on top of that high up shelf, including a vintage globe from Etsy (I love looking at all the old country names like Anglo-Egyptian Sudan and  Baluchistan. By the way, if you have a vintage globe and want to figure out how old it is based on the outdated names for countries, this page is great.), a decorative vase that used to sit on my desk, and a jar candle I very nearly got rid of in my recent goodwill donation.


So that's it! My new entry way area, opposite the much-pictured foyer corner. Finally that area is worthy of a pic on the old blog. Now if only I could find a way to take a picture of that area without flash that isn't dismally dark...man I wish this area had some natural light!

PS- if you like that update, check back soon to see the updates I am making in my bedroom, one of them is eerily similar to the update that bench got....

So- do you guys have any projects you just keep revisiting? Sometimes it takes a few tries to get something right!


Linking up to Remodelholic and Miss Mustard Seed's  Friday Parties! If you stopped by here from one of those link parties, I'd love to hear from you!

LinkWithin

Related Posts Plugin for WordPress, Blogger...